


Users have been irritated with the error code Bee for a long time, as it is the most irritating Destiny error code you face. According to Bungie’s official announcement, faulty communication between the Bungie’s servers and your modem is the cause of this error. But most users claim that the Error code bee Destiny 2 occurred with perfect network settings.
There can be multiple faults that caused this error, which can be fixed with various solutions, but sometimes you never know the honest answer for your occasion.
So, according to your requirements, we recommend various solutions to resolve your Bee error code.
Here is all about PS4 Error Code WS-37337-3
Check Server Status
Ensure that Destiny 2 servers are not undergoing maintenance or experiencing issues. You can check the official Bungie Help Twitter account or the Bungie website for server status updates.
Restart Your Network Equipment
Power cycle your modem, router, and gaming console or PC. It can help refresh your network connection and resolve temporary issues.
Use Wired Connection
If you use a wireless connection, connect your gaming device directly to the router using an Ethernet cable. It can provide a more stable connection.
Check Firewall and Antivirus Settings
Ensure that your firewall or antivirus software is not blocking Destiny 2. You should add Destiny 2 to the list of allowed programs.
Port Forwarding
Forward the necessary ports for Destiny 2 on your router. Bungie provides information on the required ports on their help page.
Disable UPnP
If your router has UPnP (Universal Plug and Play) enabled, try turning it off. Sometimes, UPnP can cause issues with online gaming.
VPN and Proxy
If you are using a VPN or proxy, try turning it off. Destiny 2 may have issues with specific VPN configurations.
Update Drivers
Ensure that the network drivers for your computer or console are up to date.
Contact Bungie Support
If the issue persists and you have tried the above steps, consider contacting Bungie’s official support for further assistance. They may provide specific guidance based on the game’s current state and servers.
Reset the Console Completely
If you restart and unplug your console, this can deal with the Bee error code, and it is a simple way to fix all Xbox problems. Naturally, this solution can be applied to the players who play Destiny on Xbox.
Ensure all the games are backed up and synced online because this process can delete the data from local Xbox One memory. These are two methods to reset the console entirely and delete the cache on Xbox One.
- At the front of the Xbox console, the press holds the power icon and waits to shut down completely.
- From the back of Xbox, unable to the power brick. Press and hold the power icon many times on the Xbox to ensure there is no more power; this process will clean the cache.
- Now connect the power brick, wait until the light appears on it, and change its color from white to orange.
- As usual, turn on the Xbox again and check if the Tapir error code occurs while starting Destiny or Destiny 2
For PlayStation 4 Users
- The IP address you are currently using can temporarily assign to your PS4. To find the IP address, power up your PS4 console.
- In the main menu of PlayStation 4, choose Settings > Network > View Connection Status.
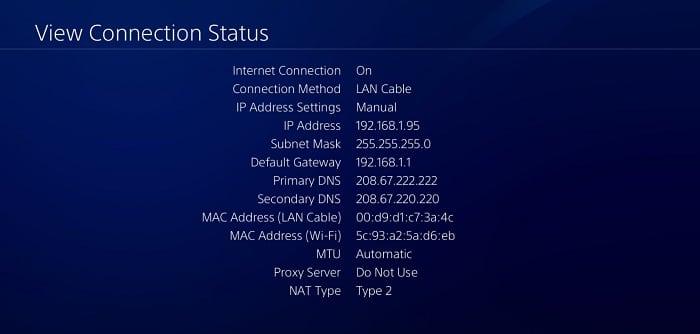
- From the recently opened screen, locate the IP address and note it somewhere as you need it to enable the port forwarding. Also, note down the MAC address of your PS4.
For Xbox One Users
The IP address you currently use can try to assign permanently to your Xbox One. An IP address is located under the advanced settings in the Xbox One Dashboard menu. To get the IP address, power up the Xbox One.
- Go to the home screen and press the menu icon on the controller of the Xbox one.
- Go to Settings, then Network, then Advanced Settings.
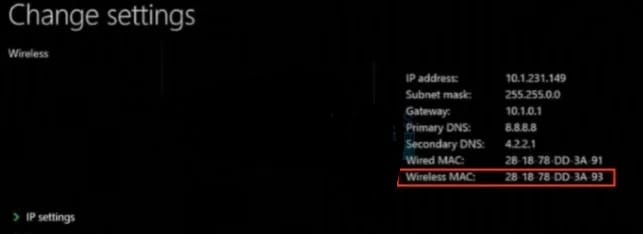
- In the IP settings section, your IP address will be listed. Note it down because it will require assigning your IP address later.
- The Wired MAC address will be located under IP settings. Note down the twelve-digit address for recently using the connection.
This was the basic information about the respective console. Here are the steps to assign the static IP addresses to the consoles.
Static IP addresses to the consoles
- Open the browser, and enter your IP address into the address bar.
- Use your username and password to get access the router’s interface. The username and password will be located in the router’s documentation; it will be on the side sticker of the router or on the Port Forward website. If you forget the username or password, you can get it back to reset your router.
- The screen you will use to add a new IP address differs from router to router, and there are no general rules to apply.
- First, find the Enable Manual Assignment option, tap on the radio icon, and next tap Yes. Sometimes this option may not be present, or the name may differ.
- Find out the window that enables you to add your wanted IP address and MAC address; enter the address you noted in the console’s previous steps.
- Once done, tap on the Add option; your IP address to your router has been added now.
Forwarding Destiny’s Ports
The last option is forwarding Destiny’s ports via the router and through the console to run the game properly again. These settings differ from router to router, but the start is the same. If you face any difficulty in these settings, get information from the help page of the router’s manufacturer. All the settings are described there correctly.
- Locate the Port Forwarding section once logged into your router. Every router will be different from another router. Menu labels that are common for the settings section included Port Forwarding are “Port Forwarding,” “Firewall,” “Applications,” “Gaming,” and “Protected Setup.” If there are not appearing on your screen or related things, you have to “Advanced Settings” and find out the Port Forwarding subsection.
- You have to use the same basic information on each router interface. Under the internal and external, enter what port you want to open or a range of ports to open under the start and end. You can do it, especially for Destiny and Destiny 2; many fields you can open on your router exist below.

- There are two options, the TCP and UDP abbreviations, which you must choose under the Type of Services Type option. You might prefer one of both options and repeat these steps many times until you have covered above mentioned all ranges.
- Now enter the static IP address you created for the console in the above information, and don’t forget to choose the Enable option if available.
- Tap the Save or Apply icon and restart the router and console so all the changes can apply fully.